Protective collar for cats can be purchased at a veterinary clinic or you can make your own hands. Regardless of the design, the main requirement for the product – it must be as comfortable for the animal. The rim wrapped around the head should not rub the neck and make it hard to breathe.
- Collar from a plastic bottle
- Other materials
- Made of thick fabric
- A plastic cone
- Requirements for the collar
- The peculiarity of the pattern
- Collar Collar .
- Stylish bow collar
- How to put it on?
- What to do if it comes off?
- How to make a protective collar for a cat with their own hands: quick, simple, convenient patterns and instructions for them
- Making an Elizabethan collar
- Hastily made – a collar made of lightweight plastic
- How easy it is to make a safe collar for a cat with your own hands
- Safety rules
- From a plastic bottle
- How to persuade the cat to wear protection
- With your own hands
- Cardboard
- Advantages of a store collar for a cat
- Making an Elizabethan collar for cats with your own hands
- From cardboard – disposable
Collar from a plastic bottle
To create a collar, you will need a clean 5-liter plastic water bottle. Carefully and evenly cut off the top, about 2 cm from the neck. On the resulting billet make a longitudinal cut. Next cut the bottom of the bottle.
The edges of the bottle are taped, and the outer corners are rounded with scissors. On both sides of the longitudinal cut you need to make holes, 2-3 cm apart. They stick a string or tape to fix the accessory, you can also use "Velcro".
The plastic bottle will make a sturdy and practical collar that can be used more than once.
Other materials
You can make protective collars from other materials at hand.
1. From thick cardboard . It is cut in a semicircle and rolled into a funnel. At the base make a hole equal to the circumference of the neck. Fastening is done with tape or stapler. The structure is one-time and short-lived.
2. made of lightweight plastic. . Soft translucent office folder can be used. The material is cut out in a semi-circle, roll up a funnel, leaving a hole in the base equal in diameter to the size of the pet's neck. On the sides with a stapler fasten Velcro fasteners, and the upper and lower edges are pasted with duct tape or adhesive tape.
Made of fabric. Use thick material. First take measurements from the neck of the animal (girth). According to the taken measurements make a pattern, the edges trimmed with thick edging. Need dense cardboard cut in a semi-circle.
The pieces are folded inside out, cardboard is placed inside, the pieces of fabric are sewn together and the edges are connected with Velcro. On the back side, lacing is made for convenient fixation of the collar on the cat's neck.
As you can see, there is nothing complicated. Cat lovers are jacks of all trades!
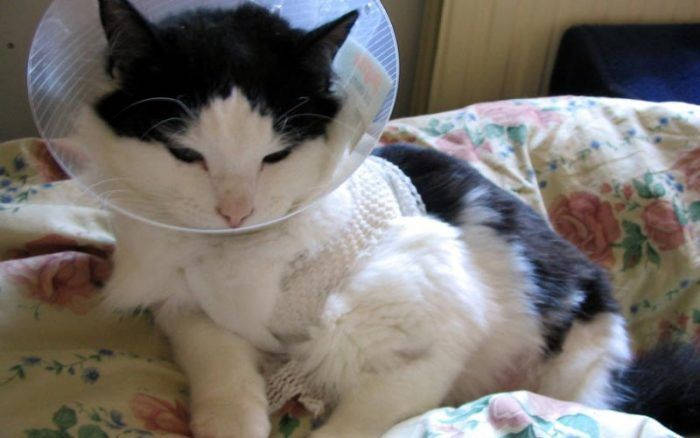
Made of thick fabric
Soft protective collar for cats after surgery is a product of high comfort. It is ideal for delicate kitties who are not ready to endure any restrictions. The collar is lightweight, cozy. It is comfortable to sleep in it.
To sew such a collar for a cat or cat after spaying is not necessary to have skills of skill. The product consists of only 2 identical parts made of natural fabrics. A thicker fabric or multilayer lining, reinforced with rhombus stitching, acts as a layer between them. To give the collar the desired shape, the opposite edges of the product are supplemented with strips of Velcro tape.
The pattern is shaped like the letter "C". The length and width are chosen according to the size of the cat.
Draw a semicircle, which corresponds to the inside of the product, on paper or directly on the canvas. Then indent the desired width and duplicate the line, making the outer half-circle. Cut blanks, remembering to include indents for seams. Fold the workpieces facing outward, putting a dense layer between them. Sew the parts. To increase the rigidity of the product, the outer edge of the stitching edge made of thick material.
Despite the simplicity of execution, this option is convenient in the sense that it has an aesthetic appearance, and it perfectly copes with the task entrusted to him.
But it is not suitable for active pets, because with regular protests and attempts to rip the collar off the body it deforms and will not provide full protection. The only way out is to observe the behavior of the pet and, if necessary, replace the soft product with a stiffer design.
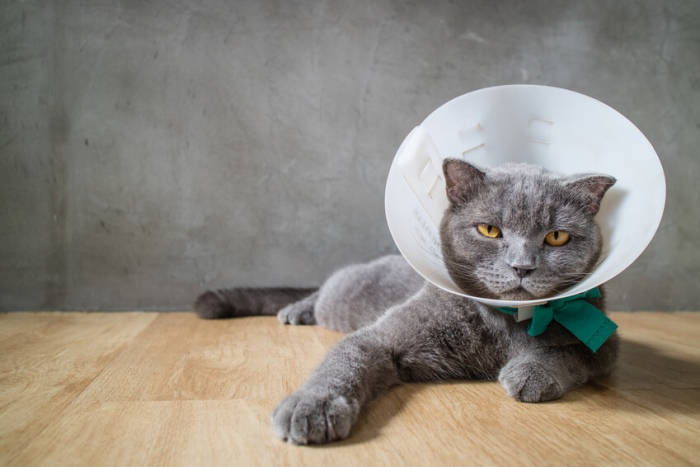
A plastic cone
If your cat is restless and persistent, in the post-operative period it is better to use a more rigid construction for him. To make a rigid collar for a cat after neutering with your own hands, it is advisable to use flexible plastic.
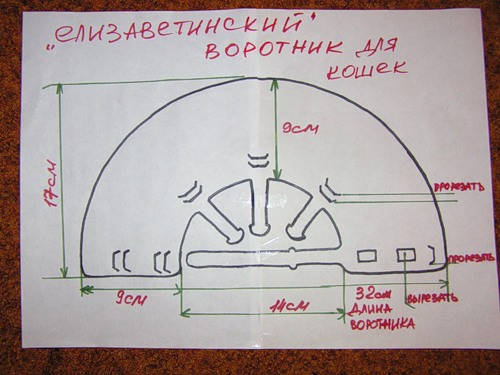
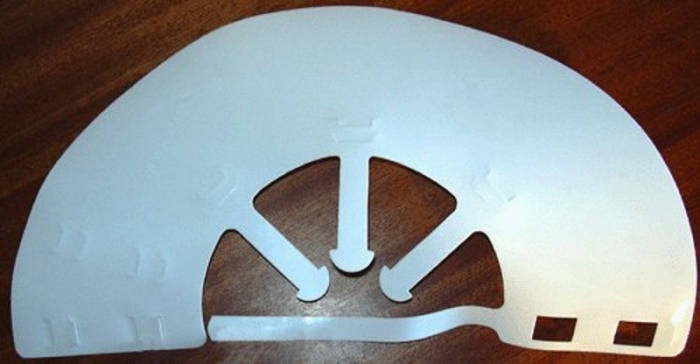
To simplify the task, take this pattern as a basis. It is better to print it first on a printer, and then already transferred to plastic.
If you have in your possession a large bottle with smooth walls, it is quite possible that the desired piece can be obtained from it. It is only necessary to attach a printed pattern to the surface and around the contour.
The numbers in the photo indicate: 1 – straps to cover the collar, 2 and 4 – places of sharp edges of the product, 3 – clasp.
To assemble the design, you only need to bend in half the three radial strips. Then a collar or harness must be run through them. The longest strip is used to connect the edges. It simply has to be run through the slots.
Important point! The main condition for creating such a collar is to reduce the injury hazard. The edges should not be sharp, otherwise they will hurt or cause chafing on the delicate cat's skin. It is better to frame them with scotch tape or a cloth strip.
Another interesting, but also quite easy to perform variant of making on the basis of a file folder is described in detail in the video clip:
If you want, you can also be limited to the very option of making a collar for cats, which is not difficult to make with their own hands from a bottle.
The basis of manufacture served as a plastic bottle. With it, the neck was cut off, and the sharp edges were glued with scotch tape. In four places at equidistant distances made holes, in which ran the ropes for fixing the collar.
Pay attention! To prevent chafing, a finger-thick gap should be left between the collar and the cat's neck. Too much of a gap is also bad, as it can easily be used by the cat with its hind paws to remove the collar.
Requirements for the collar
Rules for the collar: it should not fit too tightly and sit loosely: a one finger gap should be left between it and the neck.
A smaller gap will lead to skin chafing, and a larger one will allow the pet to remove the protection.
The edges should not be sharp, so as not to hurt or rub the pet's skin. The collar should also be as transparent as possible. Buy protection should be without an unpleasant odor, you should not take a very cheap one.
The peculiarity of the pattern
The collar is purchased in a special store or made from plastic, cardboard, fabric. The pattern in this case looks like a half-ring. The height, length, width depend on the size of the animal. It is used to make a cap-like collar with a neck notch and staple the edges together. First measure the girth of the neck, which is the length of the inner half-circle and the length from the neck to the tip of the nose. The collar is not made too high so that the cat can see its surroundings.
Collar Collar .
This collar can be made very simply and quickly, and most importantly, any cat will be simply irresistible in it. How to make this decoration, prompt a master class below.
For this stylish cat collar you will need only a shirt and scissors. The shirt can be absolutely any, monochrome or plaid, shabby or originally did not fit the size of the owner. In other words, a shirt that no one will wear anymore. A great method for disposing of old clothes.
The first thing to do is to remove the label so that it does not make the pet uncomfortable.
The buttoned collar is convenient to cut in a circle, trying not to hit the threads, otherwise the product can fray over time. If desired, the edges can be machine stitched or hand-stitched.
You can surprise your friends and neighbors with this unusual design. It is important that the chosen shirt should match well with the coat of the pet, then its image will be just perfect.
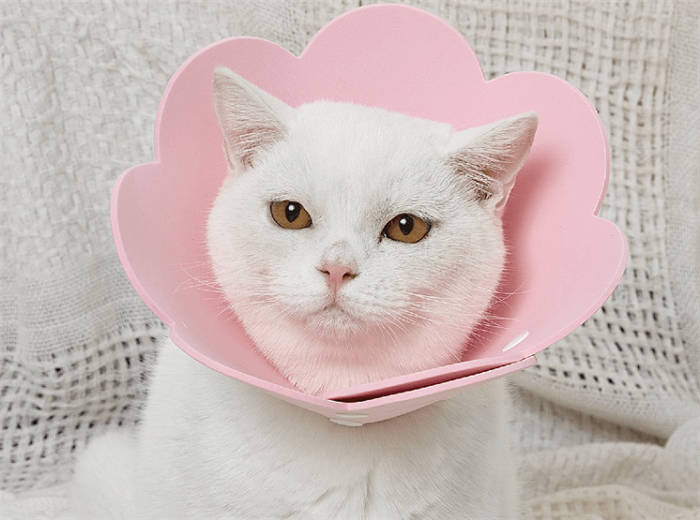
Stylish bow collar
Also a bow collar will look great on a cat. You can easily sew it yourself from any fabric or ribbons of different width, solid color, striped or polka dots. And most importantly, such a decoration will instantly transform the cat into a real gentleman.
For sewing, you'll need three different-sized blanks. The approximate length of the collar is 5 cm, the base for the butterfly is 12×24 cm, and the middle is 5×7 cm. At your discretion, you can make a butterfly larger than the one shown in the example.
First you need to sew the butterfly. To do this, the edges of the rectangle is bent to the center, so that all was symmetrical, and well ironed.
On the same principle fold a small piece. Then both pieces should be bent horizontally and stitched, a little away from the edge.
Next, the parts are turned out, leaving the seams inside, and the base of the bow is put through the resulting small ring as shown in the photo. Butterfly ready.
It remains to sew the collar. The edges of the fabric folded to the center and carefully ironed as you did with the butterfly. If desired, they can be stitched. Then sew on the velcro, passing on its contour and making a few stitches crosswise.
When finished, the collar is threaded into the same ring, behind the butterfly. The accessory is ready and it's time to call the cat for a fitting.
How to put it on?
There are cases when the veterinarian did not put the collar on the animal or when you made it yourself. In such cases, the question arises, "but how to put it on properly?" To do this, you need to follow some simple rules. First, you need to measure the cat's neck so that the collar fits the size. It should not dangle, but also not put pressure on the neck.
Then prepare the collar. Fasten it to a collar or a piece of soft cloth. If the animal is frightened, take it, wrap it in a soft towel and calm it down. The collar should be put on very carefully so as not to hurt it. Very many animals do not like to be put on foreign objects, and cats may behave aggressively. In this case you will need a helper.
Then the cat will have to be held by the scruff of the neck. Once her head is in the collar, try to calm her down. Then secure the collar around her neck. Make sure nothing is pushing or dangling. There should be a finger's distance between the collar and her neck.
What to do if it comes off?
Most pets take quite a long time to adapt to the collar and initially intend to take it off. In most cases, this is an adequate reaction, but there are times when it indicates improper use, which brings the pet stress and discomfort. You can understand it by how much time has passed since wearing it.
In the event that the cat tries to remove the construction for the first time, there is nothing wrong with that. You can get your pet used to it. You just need to pay attention to it, you can put it on your lap, play with it. This will help the pet to get used to the collar. And if a day or more has passed, you should find out whether the collar does not bring discomfort (heavily tightened, nicks into the corners, closes the view). If not, it is worth replacing it.
On how to make a veterinary collar for a cat with their own hands, see the following video.
How to make a protective collar for a cat with their own hands: quick, simple, convenient patterns and instructions for them
Unfortunately, our pets also get sick and their illness is far from always predictable. If the cat is on the operating table, it will need special care. The speed of the cat's recovery depends not only on the owner, but also on the integrity of the stitches. The problem is that healing stitches are very itchy and make the cat itchy to lick or even chew on them. To keep the stitches intact you need to buy or make a cat collar.
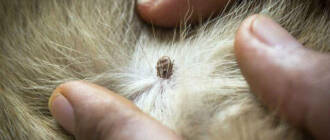
The Elizabethan collar is a post-operative accessoryBut it is also used for other purposes. For example, in many skin diseases it is contraindicated to wet the skin, and the cat can lick it. With ear mites, pets scratch their heads a lot, and the collar will prevent this. Cats really don't like bandages and take them off with all their might. The pet usually uses its teeth to untie the knots, but with a collar, it won't be able to do anything.
Important: If the vet has prescribed wearing an Elizabethan collar, this recommendation should be heeded.
You won't be able to watch your cat every second. Even if you take time off from work, you will have to sleep…and what will your ward be doing in the meantime? That's right, scratching, licking, removing the bandages or blanket, etc.
The Elizabethan collar has slots into which the collar is slipped. Some models are fixed with ties or duckies, which is not quite suitable for temperamental animals. It should be taken into account that when wearing the collar, the cat must be able to take food and water, that is, its fields should not be too long. If your pet declares a boycott, then the collar has to be removed for the time of eating and water, of course, under your strict supervision.
Be assured that your pet will not be happy with the collar. He will move around strangely and look at you pleadingly for a while. Don't give in, most cats quickly get used to the accessory, and if your pet is too persistent, check to see if the collar is rubbing.
Making an Elizabethan collar
Accept for the fact that you may not have the opportunity or time to find and buy a suitable accessory. However, you should not worry about this, it is not difficult to make a protective collar with your own hands, even without the name on hand of suitable materials. To make an accessory in a hurry you can use cardboard, a plastic bottle, a pot for seedlings and other blanks. The only thing you will definitely need when making an Elizabethan collar is a wide and comfortable collar to wear.

An even better option would be to attach the accessory to a harness. With a harness, the weight of the collar, and therefore the load, is distributed along the spine, rather than resting only on the neck.
Hastily made – a collar made of lightweight plastic
The easiest option is to make a collar out of a binder. If you cut it at the short seams, you get a fairly large, flexible, laminated cloth. In addition to the folder, you will need:
To make the collar, take two measurements: the neck circumference and the length of the head in a straight line from the neck to the lobe of the nose. On the sheet draw a pattern of two circles:
- The smaller one is the girth of the neck.
- To draw a big circle from the smaller one we take the second measurement (head length) with a 2-3 cm margin upwards.
- Inside the small circle draw a third circle smaller by 2-5 cm, it will be allowance for fasteners on the collar.
- Cut out the pattern on a large circle with a reserve. If you are not sure about the length, it is better to cut a larger circle and shorten it after trying it on.
- From the center of the three circles and the edge of a straight line, on it we cut a pattern and cut out the inner, smallest circle.
- The smallest circle is cut perpendicularly 5-6 times – this is a blank for the loops.
How easy it is to make a safe collar for a cat with your own hands
Despite the rudimentary design, veterinary collars are not cheap. Another thing – homemade devices that protect the animal no worse than the purchased, but at the same time cost mere pennies.
Safety rules
A good, and most importantly safe collar is easy to make with your own hands from improvised means.
An important point – it is necessary to measure the circumference of the cat's neck, so that the protection fit tightly, but in no case pressed.
Also, you should not choose materials that may harm the pet. We are talking about toxic substances that may be impregnated with the base of the product.
Cats have a highly developed sense of smell. Therefore, it is not recommended to use materials (including finishing and bonding materials) with a pungent odor. Paint and glue in this case can be the reason that the animal will refuse to wear a bad smelling collar.
From a plastic bottle
This option can be called a universal one, because the bottles make quite strong, but at the same time flexible and relatively durable E-collars. And the manufacturing procedure itself does not involve any complicated steps:
- Choose a bottle of the right size, focusing on the circumference of the neck of the pet.
- Make a marker (for lines to be clearly visible, it is recommended to take bottles of white or transparent plastic).
- Cut off the neck and measure the length of the cat's head.
- Cut along the almost ready collar to make it easier to put it on and take it off.
- Along the line of the cut, make a fastener (lace, velcro, etc.)
Important: The cut plastic bottle has sharp edges. To prevent the cat from injuring itself on the collar, you should trim it with a soft cloth or adhesive tape.
How to persuade the cat to wear protection
Constructing a medical collar or its likeness is only half the battle. After all, you still need to persuade the cat to wear it. And in this case, it is important not to frighten the cat by putting on the necessary accessory for the first time:
- Never scold the cat or try to use force!
- Wrap the cat in a soft plaid or towel and gently hold it by the scruff of the neck (this calms absolutely all cats, as this is how cats carry their kittens).
- As you wrap the cone around your cat's head, talk calmly to him.
- Try to put the collar on quickly, but very carefully.
- Once you have secured the accessory, make sure that it does not squeeze the cat. To do this, put your finger between the neck and the collar – it should slide in easily. At the same time the product should not dangle, because then the cat will easily get rid of it.
It will take a couple of days for the cat to adjust to the new way of life. Naturally, the collar will get in the way, but it is not recommended to take it off. Firstly, it will be much more difficult to put it on a second time and secondly the cat will definitely remember it and manipulate you.
Heavy or too bulky collars will constrain movement, so it is recommended to prefer lightweight and safe models. But even the most comfortable cone implies increased attention to the area of contact with the skin. The area under the collar should be checked daily, avoiding skin chafing. You should also take into consideration that with the neck brace the cat has no opportunity to lick its own fur, so you will have to use the down groomer more often.
If the cat has to walk around with the cone for a while, you have to give it more space. In addition, there is a risk of getting stuck in the narrow passageway. This should not be allowed, as an already unhealthy animal can be further traumatized.
The last point that is important to consider is the peculiarities of eating in the E-collar. The cat must have free access to bowls of food and water.
With your own hands
It is not always possible to quickly find a ready-made medical collar of the right size and dimensions. Moreover, there may be a situation when a protective accessory is needed urgently, and there is no time to search and buy it. There is only one way out – to make the E-collar with your own hands.
We will consider the most popular models of homemade collars and tell you how to make them at home.
Cardboard
Cardboard construction can be built in a hurry, when the animal urgently needs a protective device. The model is not suitable for long-term use, but it may well cope with its task for a few hours. In the future, you should use industrial samples or collars made of other materials: plastic, soft fabric.
To make yourself a collar from cardboard will need: cardboard, tape and string.
- Take thick cardboard. Appropriate boxes from household appliances or shoes.
- Measure the cat's neck circumference (Measure #1) and the length of the neck from the collar to the tip of the nose (Measure #2).
- Draw a cone on cardboard with the length of the inner circle equal to the neck circumference (+2,5 cm). The width of the piece will be equal to the second measure (+2.5 cm).
- Cut the collar according to the drawn pattern.
- The edges of the cone must be treated with tape.
- With the help of a lace to fasten the parts of the cone.
- For ease of carrying – make loops for the collar.
To fasten the edges of the cone, you can use a stapler, duct tape or scotch tape.
A cardboard collar is convenient to use for anti-flea treatment of the pet.
Advantages of a store collar for a cat
A store-bought veterinary cat collar will cost more than a homemade one, but it has a number of significant advantages. These include:
Such an accessory is ideal for rehabilitation. In all other cases, you can save money and make protection with your own hands.
Making an Elizabethan collar for cats with your own hands
If you do not have the opportunity to visit a pet store, and you need a protective cone yesterday – make it yourself. This does not require any special talent, so anyone can cope with the task. It is enough just to adhere to the instructions that explain in detail how to make a collar for cats with their own hands from cardboard, plastic bottles and other materials that happened to be at hand.
From cardboard – disposable
The disposable collar is suitable for anti-flea treatment – so that the cat won't scratch or lick off the product. It also comes in handy for one-time manipulation. The cardboard accessory can be worn for a maximum of 3 days.
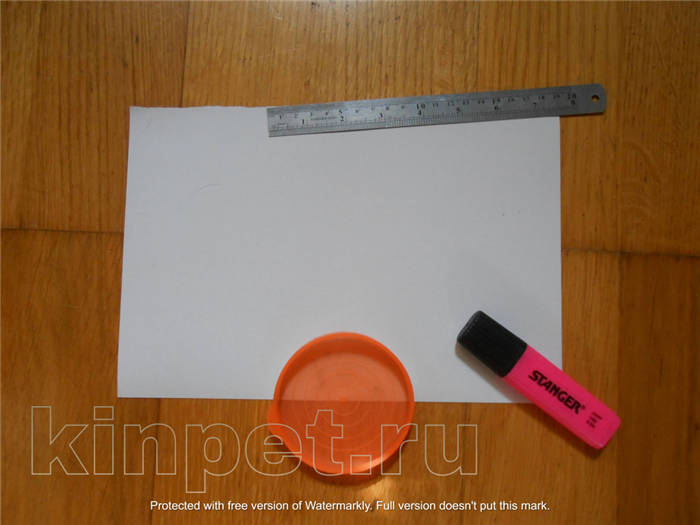
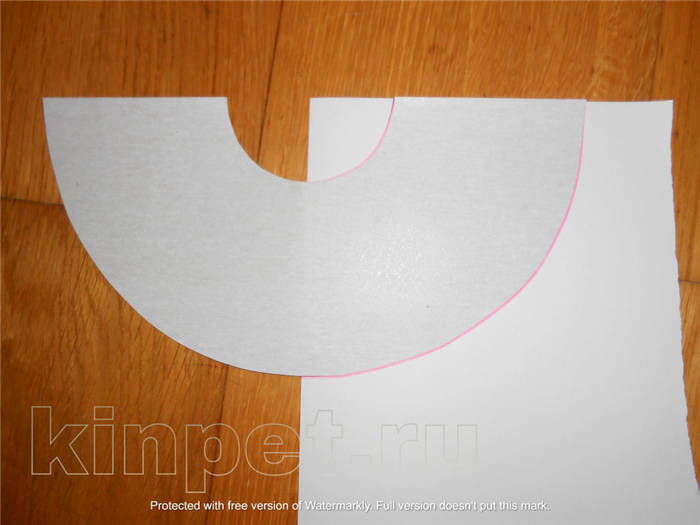
Step 1. Prepare all the tools. Find the middle on the long side of the cardboard sheet.
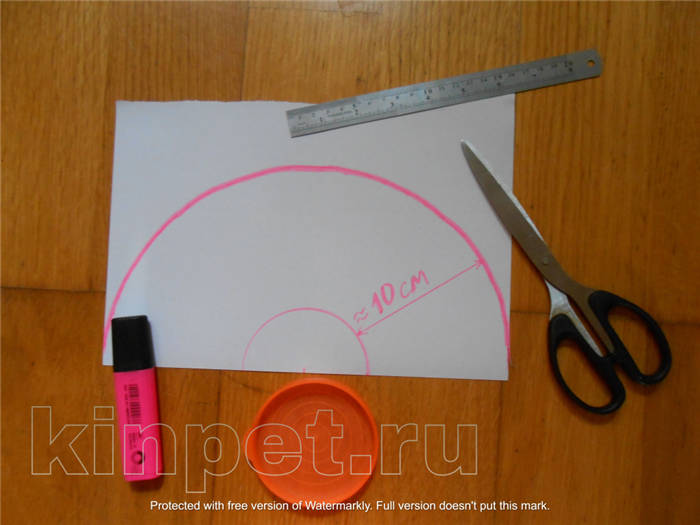
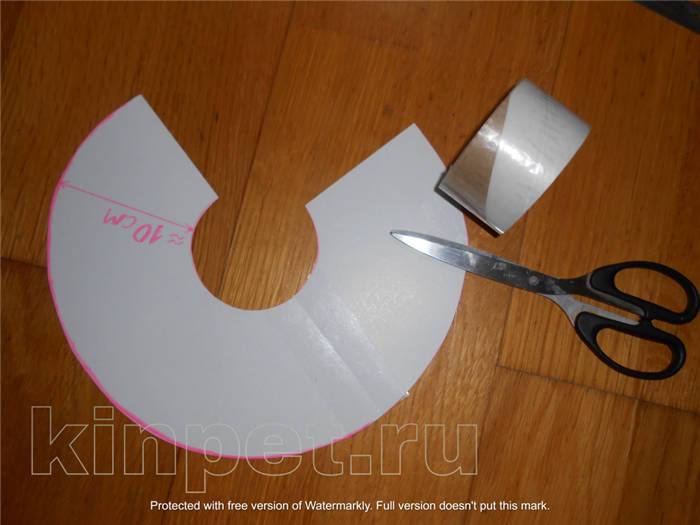
Step 2. Starting from the found middle, outline a semicircle using a lid or a compass. The radius for a medium-sized cat will be 6 cm, but it will be adjusted after trying it on.
From the inner semi-circle step back about 10 cm and draw the outer semi-circle.
Step 3. Cut out the blank – you have a ½ circle. Now place it on a second piece of cardboard and outline and cut out ¼ of the circle.
Step 4. Tape the cut together. You should have ¾ of a circle – that is, a full-fledged collar.
Step 5. Try the collar on the animal. If it's too tight, take a little away from the inside radius. Don't start with large numbers – 0.5 cm off the edge is often enough.