Beading is a type of arts and crafts. The beads themselves, types of beads, beading technique and robot techniques have been known since the days of ancient Egypt. Flat weaving is also called parallel weaving, because the finished products look like they consist of parallel rows.
- Bead Ring Tutorial with Pussycat
- 💜Beads💜
- In Love With You – BLVKSHP
- creative princess
- How to weave a kitten out of beads: master class and weaving schemes
- The cat from beads with his hands
- A Kitten Named Woof with Beads
- Master class on "monastic" weaving
- A kitten made of beads. A master class with a step-by-step photo and a scheme of beading
- bisernix
- ⲧⲩⲧⲟⲣyLikes: 139.6K.Comments: 1K.Videos in TikTok (tiktok) by user ⲧⲩⲧⲟⲣy LUV 2 – COLDCLOUD 🌊🐋 Ⲩⲕⲣⲁⲱⲉⲏυⲉ υⳅ ⳝυⲥⲉⲣⲁ 🐋🌊Likes: 12.4K.Comments: 239.TikTok video by 🌊🐋 Ⲩⲕⲣⲁⲱⲉⲏυⲉ υⳅ ⳝυⲥⲉⲣⲁ 🐋🌊 (@beadsxberry): "1/3 💗🌝provide an active 🥺💖#beads💕⚡️#beadsxberries#beadsxberries#scheme".Cat | On | Tutorial | . Breaking Hearts – Max Farrar & Pat Monahan. 162K views | Breaking Hearts – Max Farrar & Pat Monahan
- LUV 2 – COLDCLOUD
- 🌊🐋 Ⲩⲕⲣⲁⲱⲉⲏυⲉ υⳅ ⳝυⲥⲉⲣⲁ 🐋🌊
- Breaking Hearts – Max Farrar & Pat Monahan
- Beaded Pendant
- Schemes .
- Scheme of weaving a flat figurine
- Parallel
- Cross weaving
- Ways of volumetric weaving of a cat
- Muzzle .
- Body
- Kitty Woof made of beads
- The head .
- The torso .
- Kitten and cat with an umbrella
- A master class on making a kitten named Woof
- Master class on "monastic" weaving
Bead Ring Tutorial with Pussycat
💜Beads💜
Part 1💗 and here's the tutorial I did the kitty in the dinosaur costume, but with the kitty in the frog costume it weaves the same way. Only the colors are different scheme on frog costume kitty will be posted soon🤟💕 #recommendations #beadwork
Likes: 949.TikTok video from user 💜Beads💜 (@beads_rings.1): "Part 1💗 and here's the tutorial I did a cat in a dinosaur costume, but with a cat in a frog costume it weaves the same way. Only colors are different scheme on the cat in the frog costume soon will post🤟💕#recommendations #beadweaving".Tutorial | On the ring with kitty🐈 In Love With You – BLVKSHP. 31.1K views |
In Love With You – BLVKSHP
creative princess
guys, sorry to be lost. toss in ideas on what to do TUTORIALS in the comments.? #pyf #goviral #beads #beads #ring beads #hellokitty #kitty
Likes: 96.1K.Comments: 780.TikTok video from user creative princess (@creativee.princess): "guys, sorry I'm missing you. toss ideas on what to make TUTORIALs on in the comments.💞#pyf #goviral #beads #beads #bead ring #hellokitty #kitty".tutorial | hello kitty ring Stolen Dance (Tribute to Milky Chance) – Chrome RIms. 1.8M views |
How to weave a kitten out of beads: master class and weaving schemes
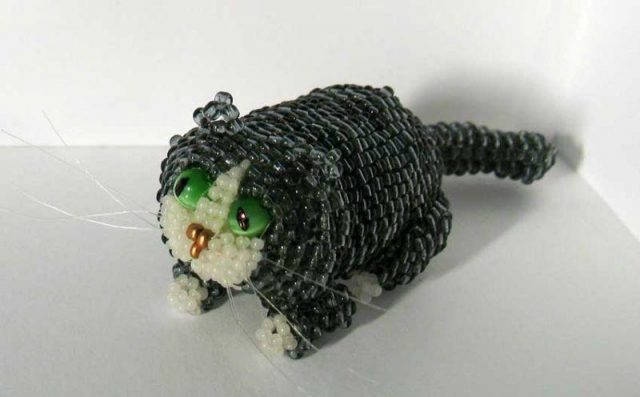
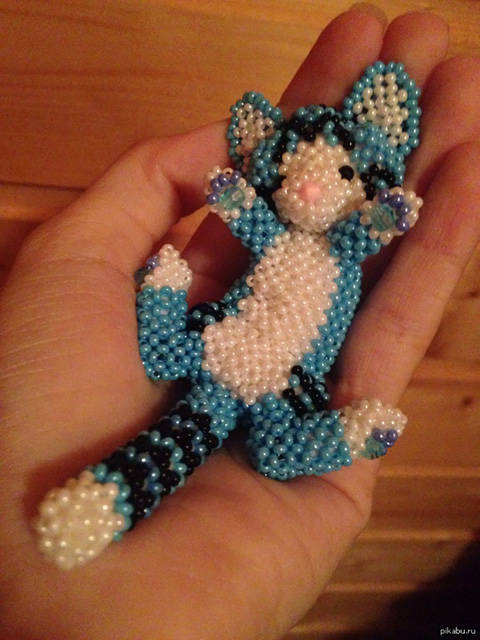
The kitten made of beads is a wonderful gift that can be presented to your relatives on any holiday: March 8, birthday, February 23, and others. After all, what could be more beautiful than a gift that is handmade with love and best wishes from a child.
In this lesson you will learn how to weave a cat in the volume technique, get the schemes of the popular kitty cat. The process of making is not complicated. You will be able to see this when you finish your work. So, how to make a beaded cat? Watch the lesson and have fun with the kids. 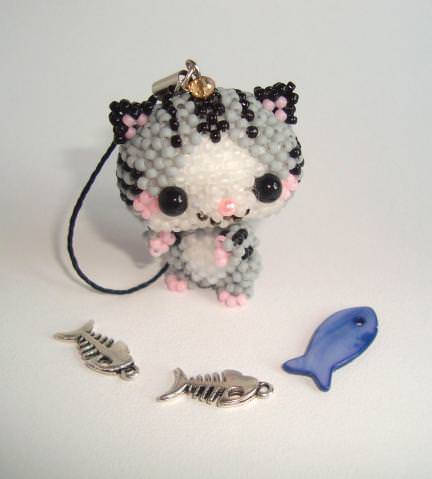
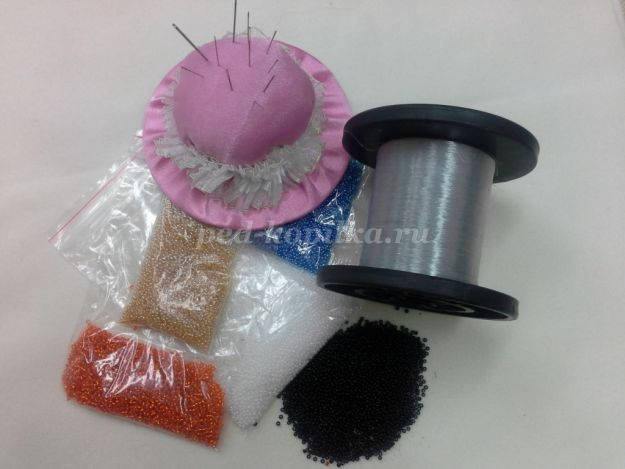
- beads (black, white, red);
- acrylic paint (black, white to paint the balls);
- larger beads (green for the eyes – 2 pcs, pink for the nose – 3 pcs, and red for the mouth – 3 pcs);
- 2 balls to model the cat (head and body);
- fishing line;
- wire;
- scissors.
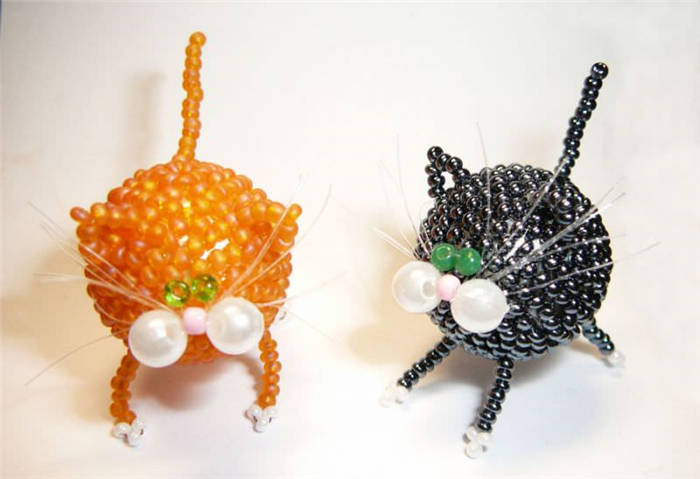
The cat from beads with his hands
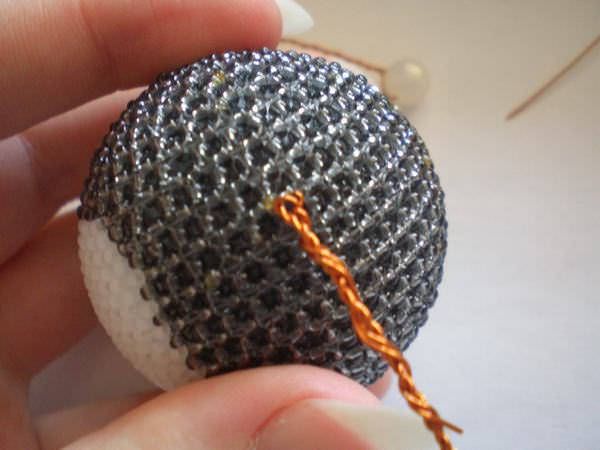
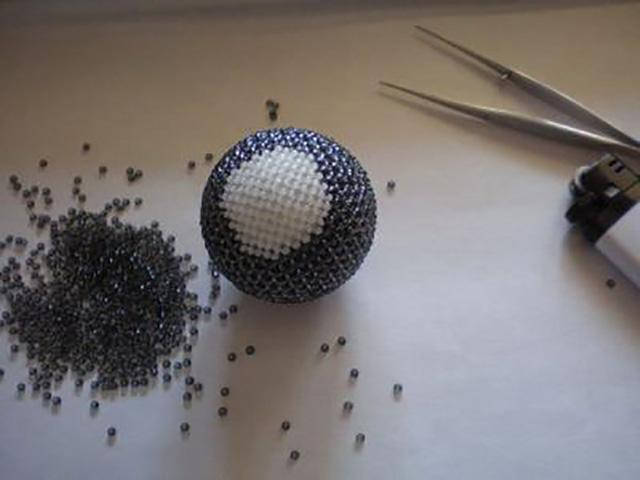
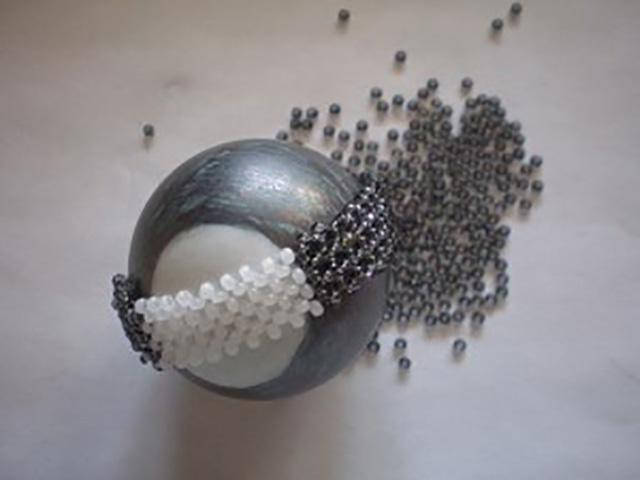
Modeling the body: we paint the ball in a color that will match the color of the beads – the color of the cat. For example, black beads, so we dye the ball in black. Just remember, for the belly we need to leave the circle white.
On the balloon we draw a belly – in the photo it is a white circle. When the paint dries on the ball, start weaving beads.
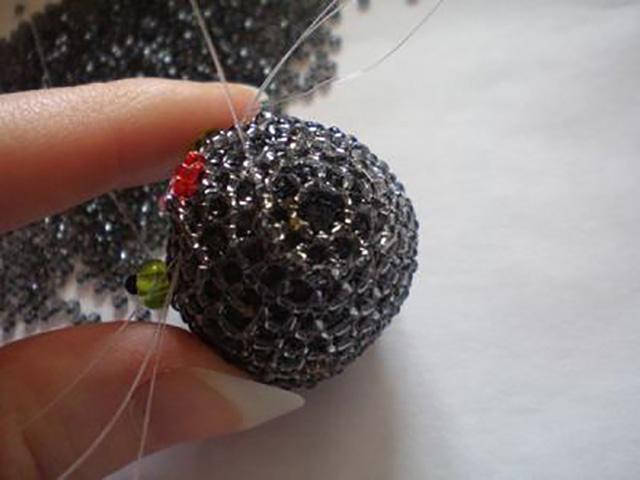
Around the circumference of the ball weave a chain cross. To get a neat product should be secured ball with a fishing line.
In both directions weave a belt. Around the belly weave a white sash. See more pictures. 
When, during the plaiting of the row along the circumference is wide – you need to remove the 1st bead. 
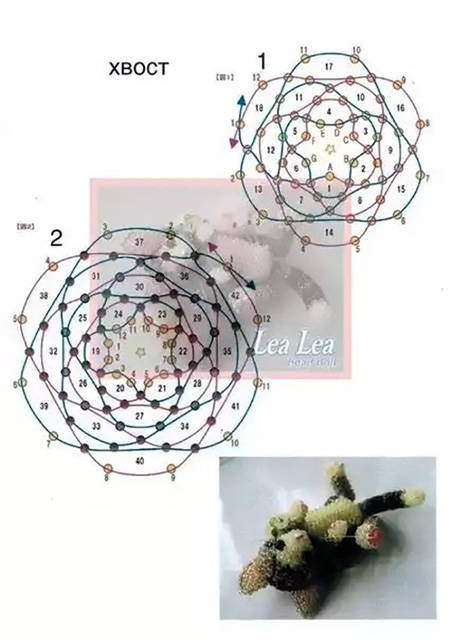
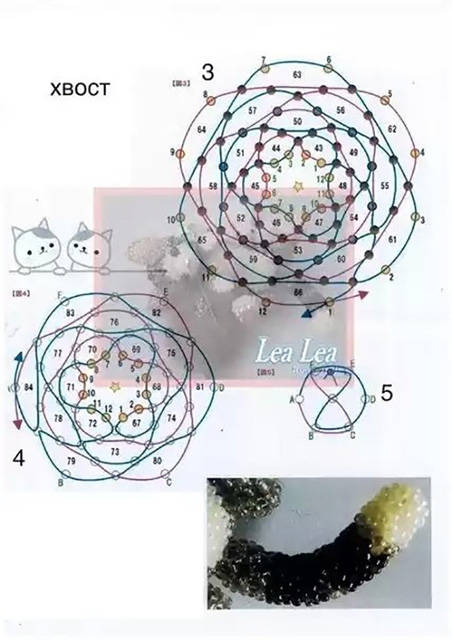
Kitten beads need paws and a tail, are engaged in their modeling: a piece of wire fold in half. On the middle of the wire we put a bead of the same color as the paws of the kitty.
Let's wrap the wire and leave tails of 3 cm. Also, do not forget to leave another 2 cm from the estimated length of the paws. This section of 2 cm is needed to twist the paws.
Make 5 blanks of the desired length: remember that the longest piece is the tail, and we use the shorter pieces for the front legs. 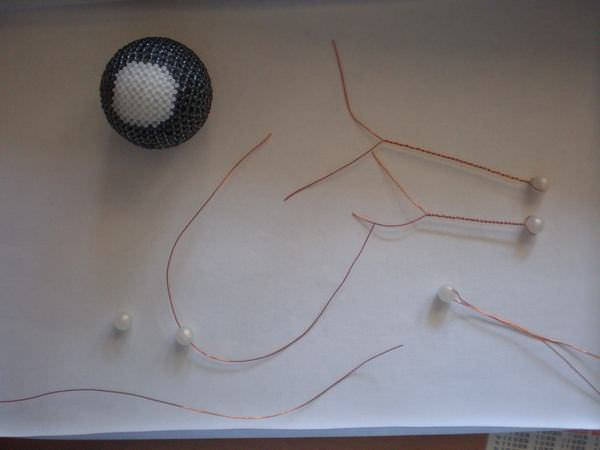
Fix the tail and paws to the body: pull the wire through the bead in the intended place, and the rest of it we twist around the wire, trim the excess. 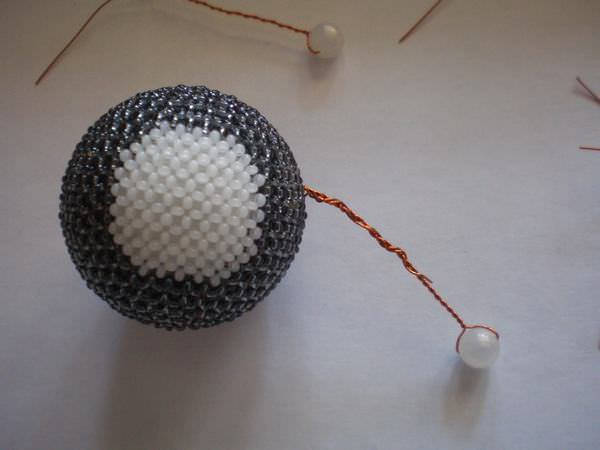
After fixing all the limbs, move on to braiding. Put the 1st row behind the beads of the body and weave a mosaic harness. For a normal thickness in the base should take 3 beads, and then – 5 beads. 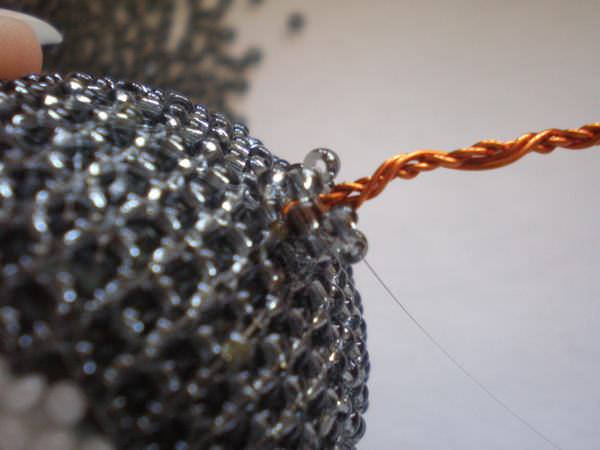
Weave up to the beads and on the edge of the flagellum weave a cross of white beads with the addition of beads in the next rows. 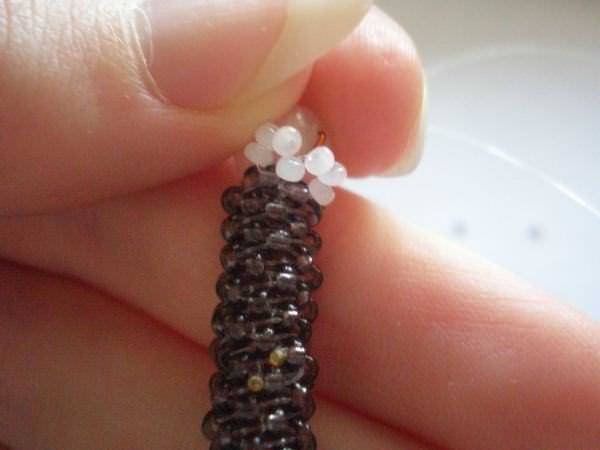
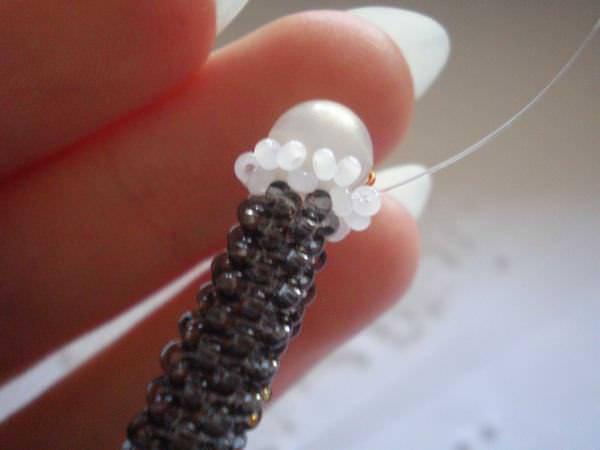
Braid a bead and a paw kitten is ready. Next, we should do the same with the other paws and tail. 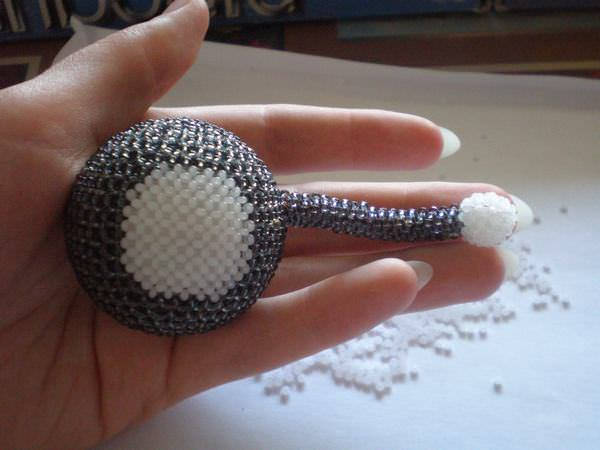
How to weave the head of the kitty? For the head we use a smaller diameter of the ball.
Such a small ball is painted by the color of the body. We wait until it dries completely.
When the ball for the head dries, you need to fix it by passing a needle with a fishing line through it. Then you can begin beading. Weave in the same way as the torso – from the waist.
After weaving the head, you can weave a heart: in the form of a heart weave 2 canvases. One side should consist of five crosses, and the other, shorter – 3 crosses each. To weave a three-dimensional heart you need to put beads on the sides inside and stitch. Next, the heart is sewn to his paws. 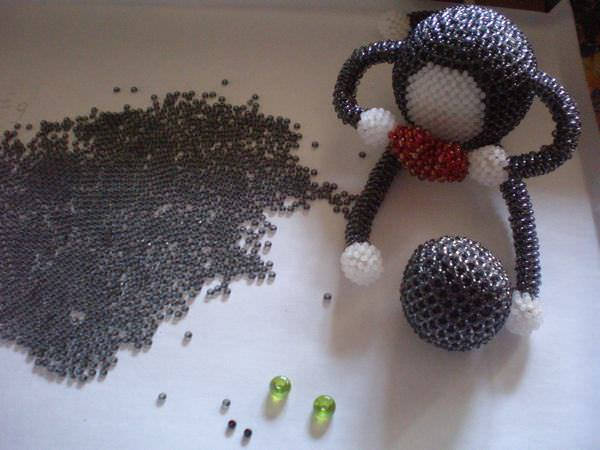
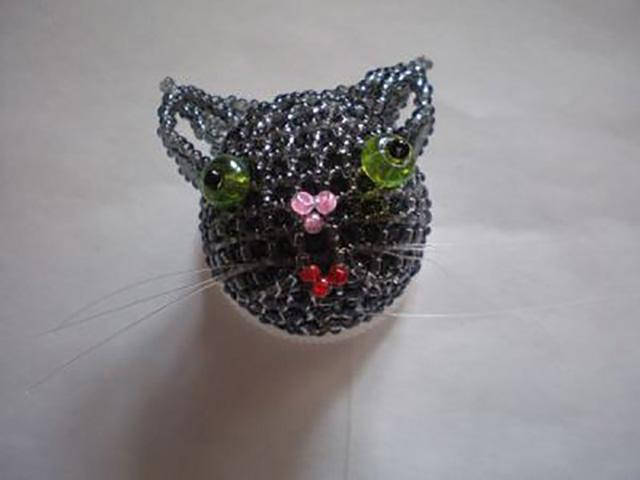
How to weave a cat face?
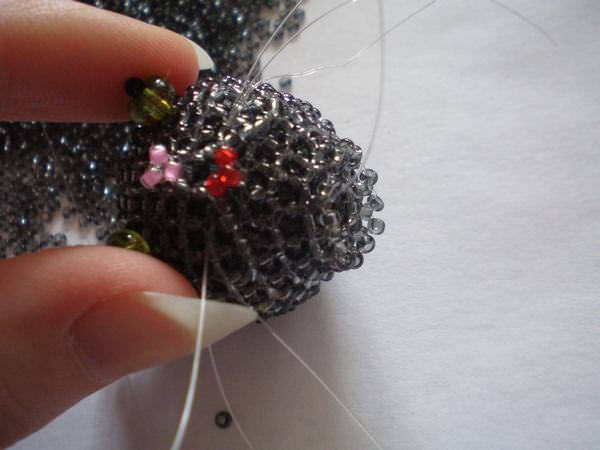
Weave a pretty muzzle: sew 2 green beads in place for the eyes – symmetrically. Weave the nose and the mouth between the beads of the muzzle (3 pink beads for the nose and 3 red beads for the mouth).
Make ears. On a wire threaded corner and weave the remainder. For weaving ears there are no clear rules. Therefore here you can weave to your imagination.
For the antennae – you need to pass through a few pieces of fishing line. In the photo, they resemble a real "cat whiskers". 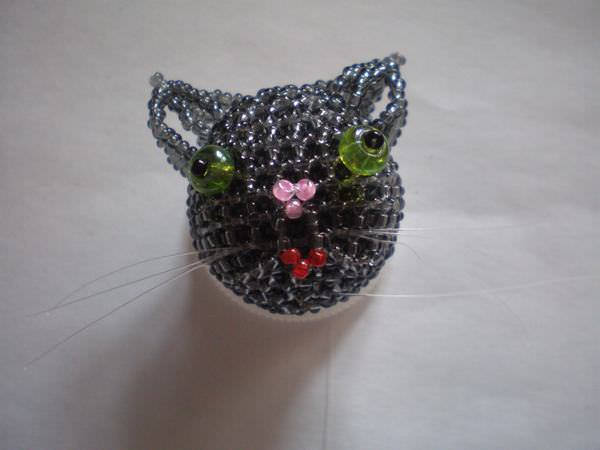
The finished head of the cat is put in place. So that the cat does not have a long neck like a giraffe – it is enough to weave just 1 row of crosses, on the bottom of the head. 
We sew the head of the cat to the body, tighten the fishing line and fuse the ends. 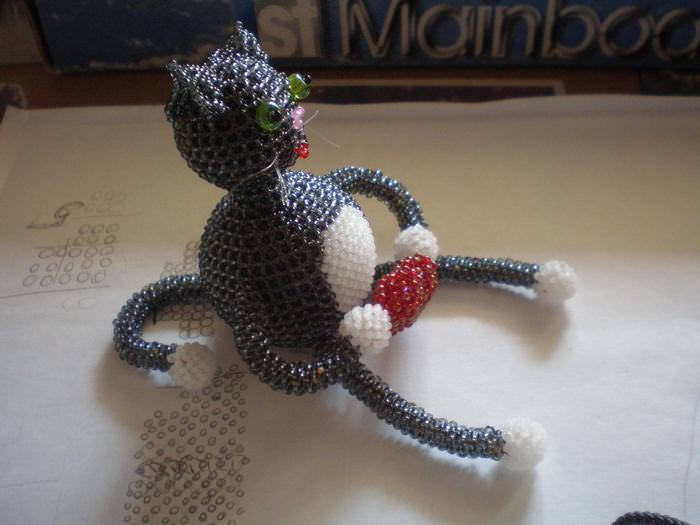
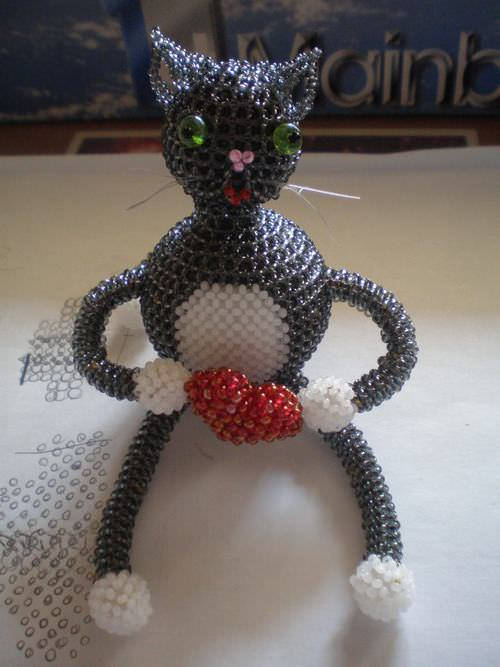
Here is such an easy master class and a cute beaded cat is ready. It turns out a fun miracle, which is not ashamed to present to your family, relatives and friends.
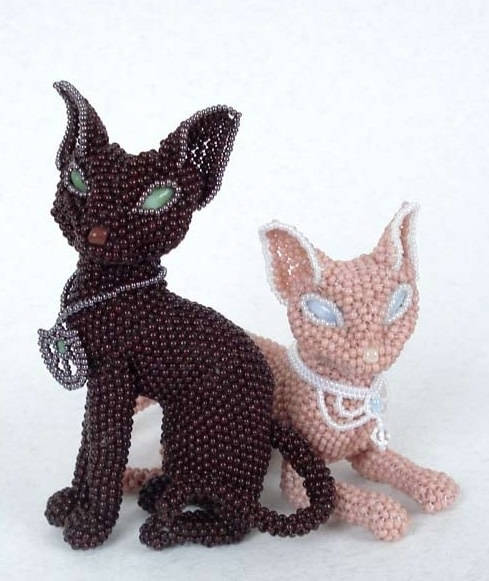
Let the master class and weaving bring you peace of mind and pleasure from the process of work. On the same principle, by the way, there will be another addition – a cat made of beads. It will keep the company of a cat! A cute couple will turn out.
How to make a beaded cat? To do this, simply change the color of the beads, for example pink, and our handicraft will play with new colors.
As a bonus and to make your work easier, you can use these interesting schemes and video tutorials on how to make an original figure.
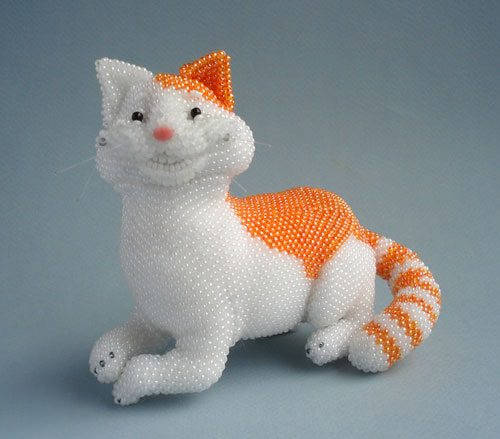
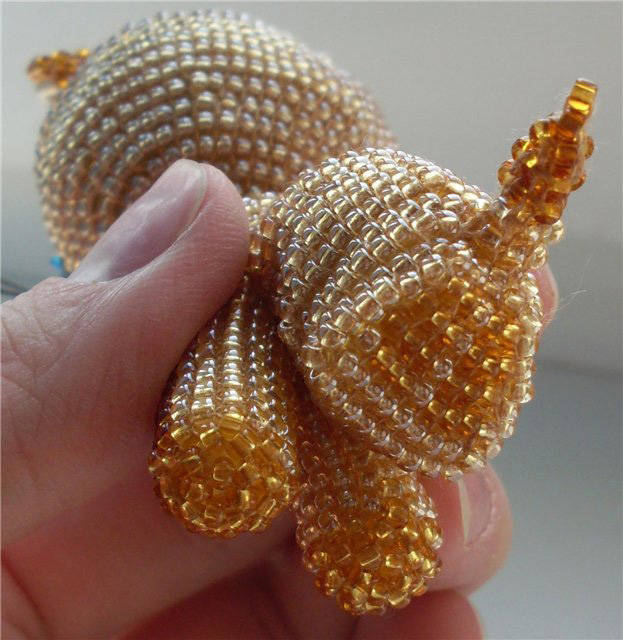
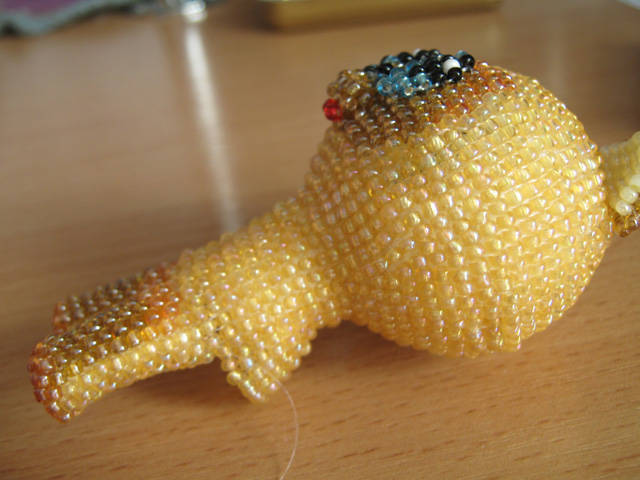
A Kitten Named Woof with Beads
This cat will also be three-dimensional, and the weaving technique is much the same as for the previous toy.
- beads (the main color will be yellow, brown beads of two shades are needed to create paws, tail, ears and muzzle, and light yellow – for the inner surface of the ears);
- details (17 black beads for the nose and eyes, 24 blue and 2 white – for the eyes, 2 red – for the mouth);
- All other tools (fishing line, wire, glue, needles, etc.).

In the master class for making a three-dimensional cat told how to make blanks from balls. You can make them out of plasticine, pasting paper, painting or marking yourself with a pencil, where to change the color of the beads on the muzzle.
The eyes and ears are woven using the technique of hand weaving, so for beginners this task may not be easy.
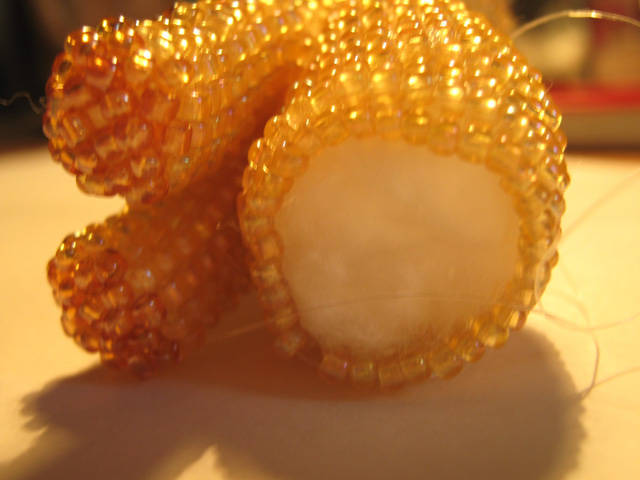
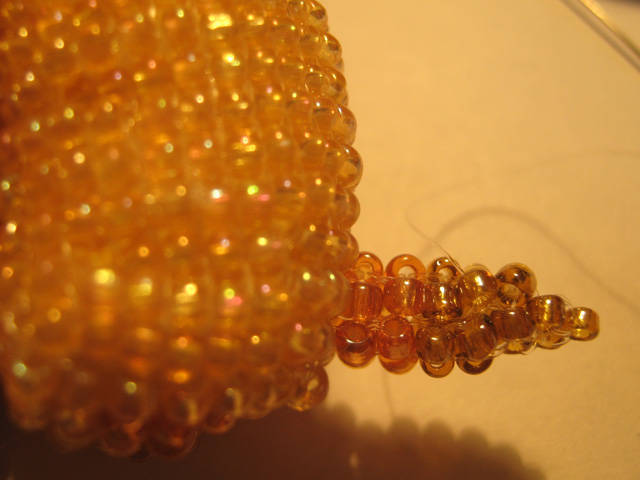
The body and paws of this kitten, unlike the previous one, is stuffed with cotton or other filler. After braiding the head just continue braiding rows with additions.
Paws need to make a mosaic weave, and then attach them to the torso. Next, you will weave only the back, and on the side of the paws will not need beads. The back to the tail will gradually narrow, and when you reach the base, you will need to fill the kitten with absorbent cotton and weave the body to the end.
You only need to attach the tail and make a moustache from black fishing line.

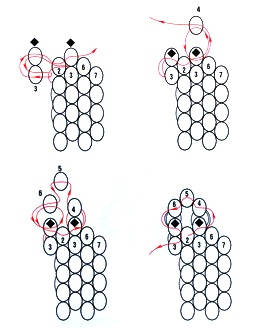
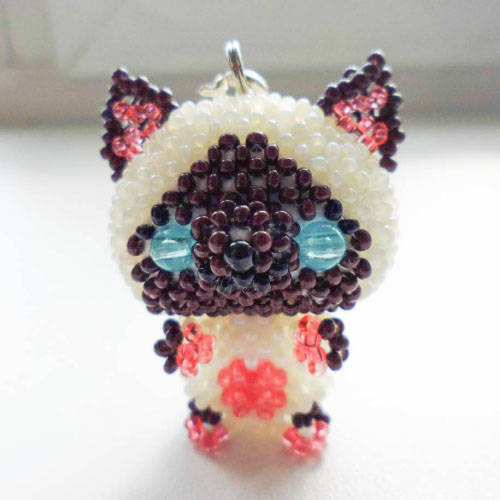
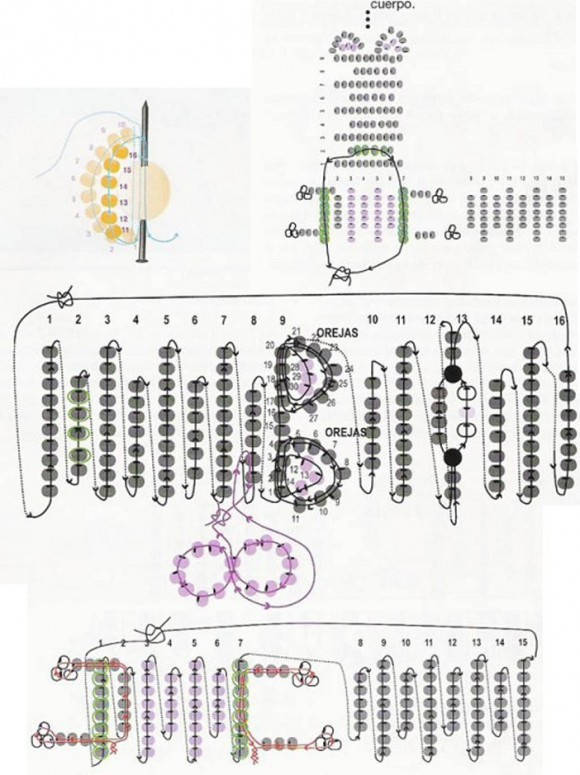
Master class on "monastic" weaving
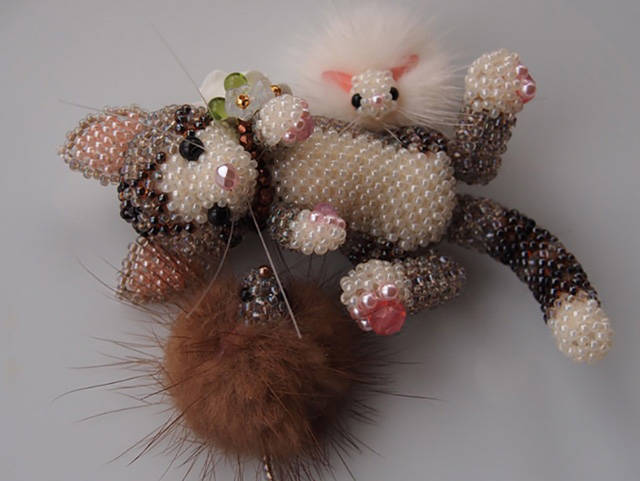
Materials and tools are almost the same as in the previous master-classes, however, beads for such a kitten should choose small and opaque, at least two different colors. In addition to small beads for eyes and nose, you will need some bigger beads to make pads for hind paws.
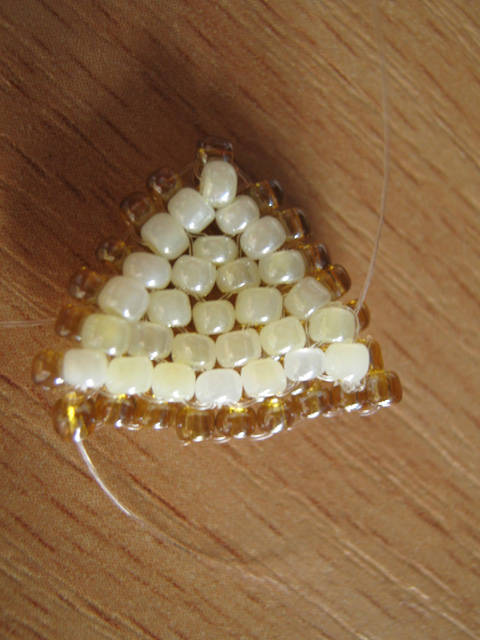
- First you need to weave a muzzle. Start with the nose beads – it will be central, because it will go from her to weave the whole head. Thread it through two pieces of fishing line (take enough length). For the muzzle you will need two colors of beads: the light one will be used in the lower part and the dark one in the upper part (you need more of them).
- So, to the nose-bead extend four beads through one fishing line and two through the other. Weave the second row so as to connect them into one ring. Between them you will need to add one more bead, and eventually the two ends of the line will go on the sides of the central bead in the middle of the bottom three beads.
- Muzzle weave in a circle "in the cross. Mark in advance where the eyes should be located to weave in those places beads in the right color. Same thing – and with the nose.
- Ears will be large and triangular. Occipital part connected to the muzzle on the sides.
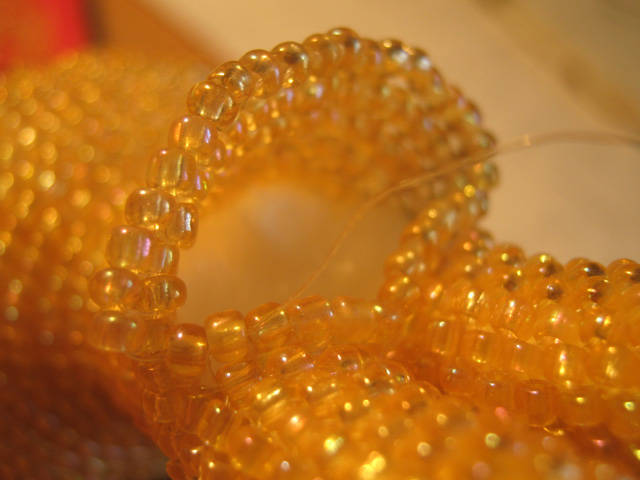
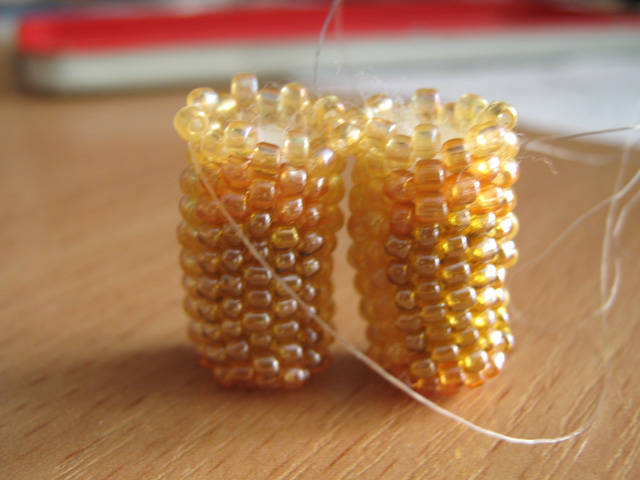
- Body of such a kitten is cylindrical in shape, its size determine your own taste. Start braiding the body straight from the head, gradually moving to the back, and removing beads while doing so.
- The tail and paws are braided using the circular technique. To make the paws more beautiful and realistic, take four large pink beads and surround them with a row of large beads that will be larger than the size of the main beads. You can make a pink kitten's toes.
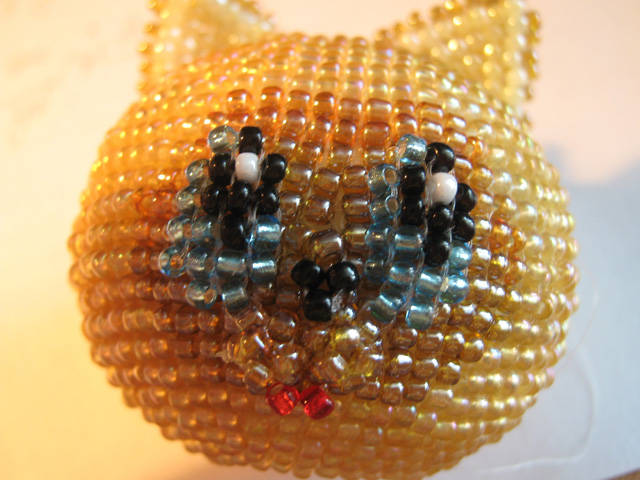
A kitten made of beads. A master class with a step-by-step photo and a scheme of beading
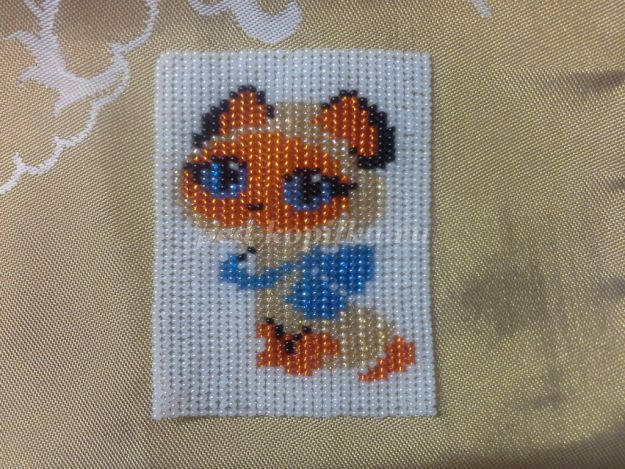
Author: Okhotnikova Valeria 14 years old.
Leader: Zylevich Evgenia Valerievna, head of the club, Municipal budgetary institution of culture "House of Culture "Yubileyny" of Tarko-Sale", YNAO, Tyumen region.
The age of the audience: The master class is designed for children from 8 years old, teachers, parents.
Purpose of the master class: Weave a kitten from beads.
Objective: To master the technique of weaving from beads-ndebele (dense weaving of cloth)
Objectives: To develop fine motor skills, attention, assiduity and patience.
I am a kitten, my tail is fluffy,
I can run fast,
I like to snooze on the roof,
And I'm afraid of mice!
Meow.
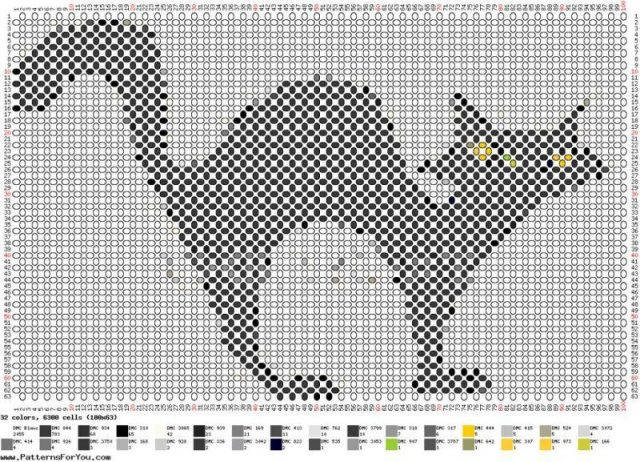
We take a sheet and lined it up or do it on the computer. The width and height of the cells should be respectively 5 mm and 5 mm.
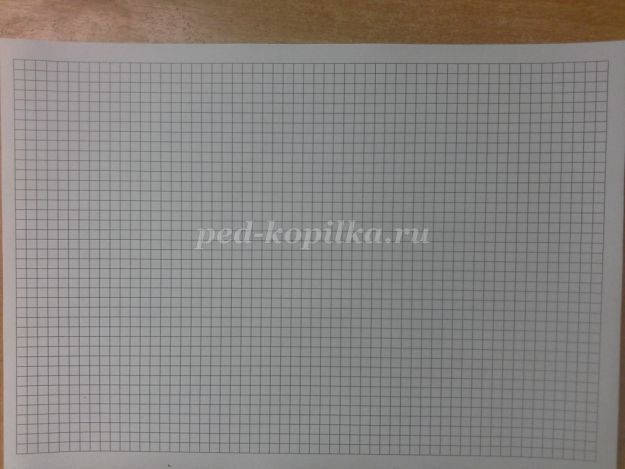
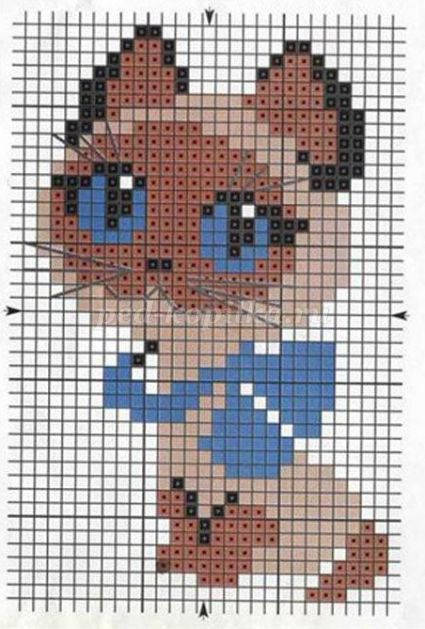
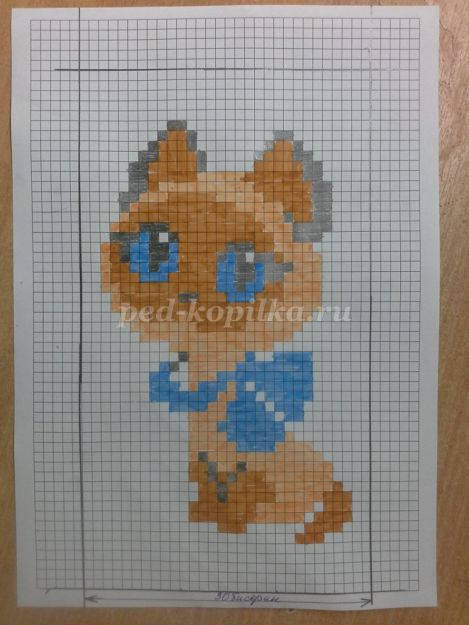
For weaving we need an even number of beads, we take 30 pieces and outline the required size by the number of beads.
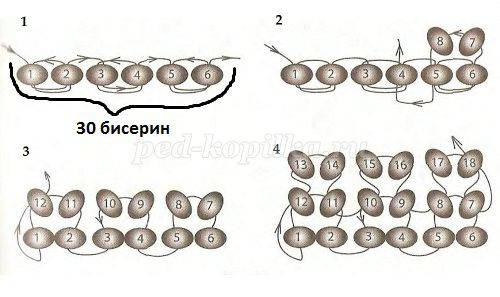
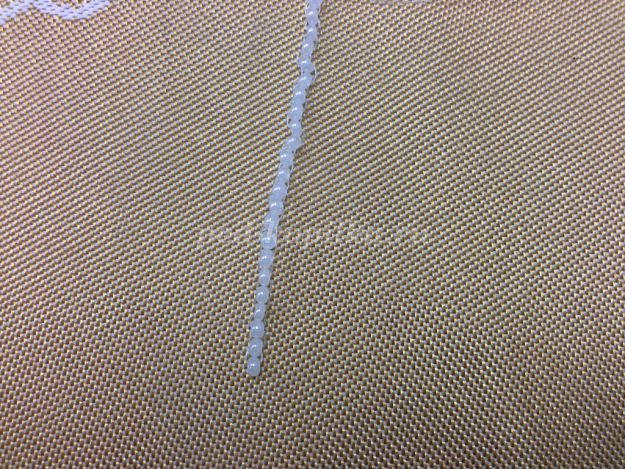
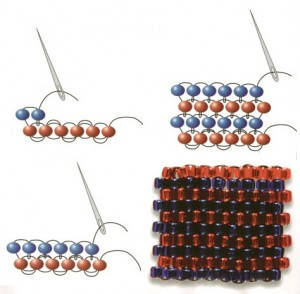
We begin to plait according to the scheme in the technique of ndebele, a width of 30 beads, the color of the beads must match the color of the cells, the scheme:
bisernix
ⲧⲩⲧⲟⲣy
Likes: 139.6K.Comments: 1K.Videos in TikTok (tiktok) by user ⲧⲩⲧⲟⲣy
LUV 2 – COLDCLOUD
🌊🐋 Ⲩⲕⲣⲁⲱⲉⲏυⲉ υⳅ ⳝυⲥⲉⲣⲁ 🐋🌊
Likes: 12.4K.Comments: 239.TikTok video by 🌊🐋 Ⲩⲕⲣⲁⲱⲉⲏυⲉ υⳅ ⳝυⲥⲉⲣⲁ 🐋🌊 (@beadsxberry): "1/3 💗🌝provide an active 🥺💖#beads💕⚡️#beadsxberries#beadsxberries#scheme".Cat | On | Tutorial | . Breaking Hearts – Max Farrar & Pat Monahan. 162K views |
Breaking Hearts – Max Farrar & Pat Monahan
Beaded Pendant
To work we will need beads #10-11: white, black, blue, pink, red, burgundy; thread or fishing line, needle, scissors.
To weave a pendant, you need to know the basics of weaving, such as "brick" stitch or just "brick" weaving.
Schemes .
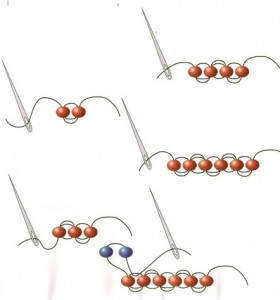
Let's make the figure this way: first weave one side, then the other, we start to gather beads according to the scheme from the number 1 below, move up to the number 2. Weave the second row from the top down, the beginning of the second row is marked number 3 in the scheme. And so on, the numbering will not let you confuse. At the end of one side secure and cut the thread and start the second side.
To make a loop on the "top" of the cat, use this scheme.
To evenly place the pendant on the chain or lace, use an additional connecting ring – open it with pliers, put the pendant behind the loop, put the chain and close the ring.
Scheme of weaving a flat figurine
Flat figures are one of the best options for those who are just beginning to get acquainted with beads. Let's take a look at two weaving techniques that will help you create a cute craft.
Parallel
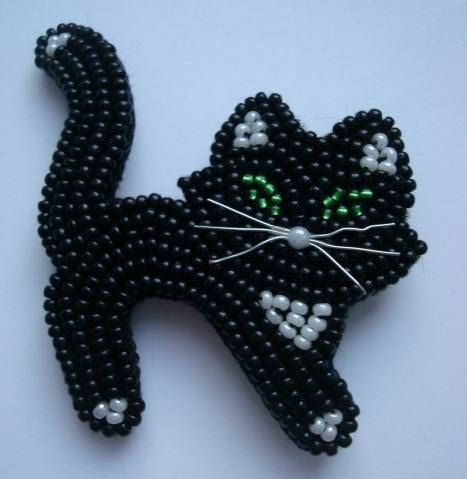
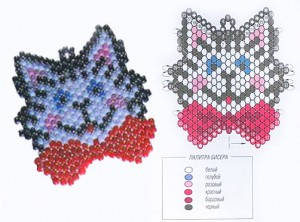
A cat made of beads, made in the technique of parallel weaving, will be suitable for use as a brooch, can decorate your phone case or purse.
Beads in white, green, pink, black or grey can be used for this pearl-weave technique. If you wish, you can use any shade, the main thing is that they match each other.
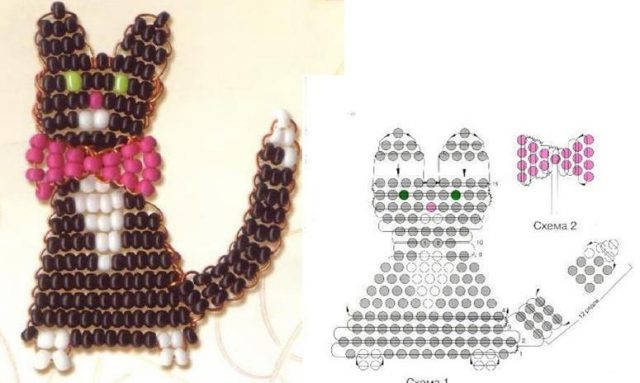
For the cat out of beads a parallel weaving scheme is used, when the beadwork is performed simultaneously by two wire ends. For the bow you can use any color of beads, it is created separately, and then attached to the figure.
Cross weaving
With the help of monastic (cross) weaving you can make not only the figure of the animal, but also weave a whole picture, guided by the scheme.
Ways of volumetric weaving of a cat
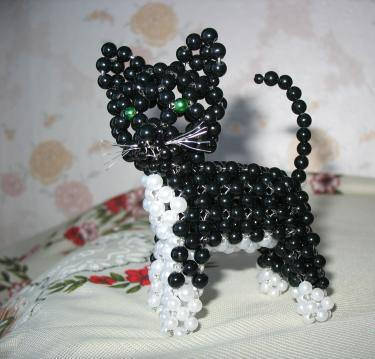
For a volumetric cat in addition need blanks in the form of two balls (you can use balls for ping-pong), acrylic paint in a tone of beads. If your future cat will be black and white, you need to paint the ball in black or gray, leaving a white circle in the area of the belly. Proceed to the production of the handicraft after the paint dries completely.
Muzzle .
Braid a muzzle for a three-dimensional cat from beads. To do this, use a workpiece in the form of a ball of such a size that the animal looks proportional. First you need to weave "in the cross" to create a beaded band, braiding, thus, the whole workpiece.
To the head you need to sew a nose, eyes and tongue. The photo shows examples of making the muzzle of a three-dimensional cat from beads.

Body
Consider how to weave the body from beads for a kitten:
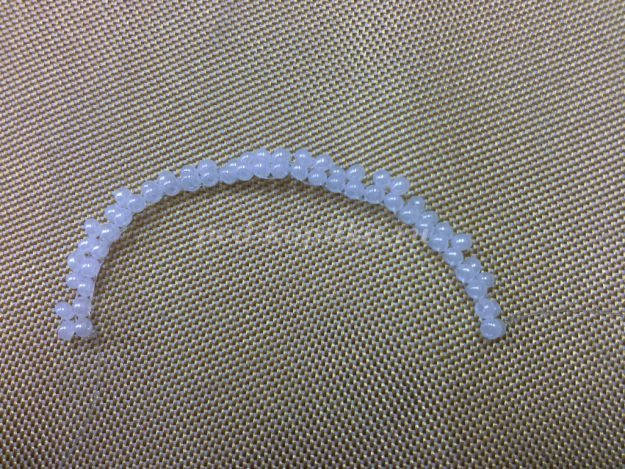
- Take a piece of fishing line up to 75 cm in length, without cutting it off the bobbin, start weaving a ribbon crosswise.
- To do this, thread 11 beads, passing one of the ends through the fifth one on the account, add three more beads, as a result you will form a figure eight.
- Weave the ribbon according to the scheme so that it fits tightly to the ball. When the tape reaches the desired length, you should pull its ends one more row of beads.
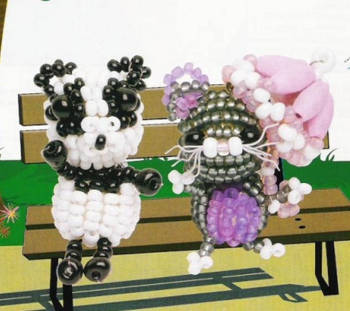
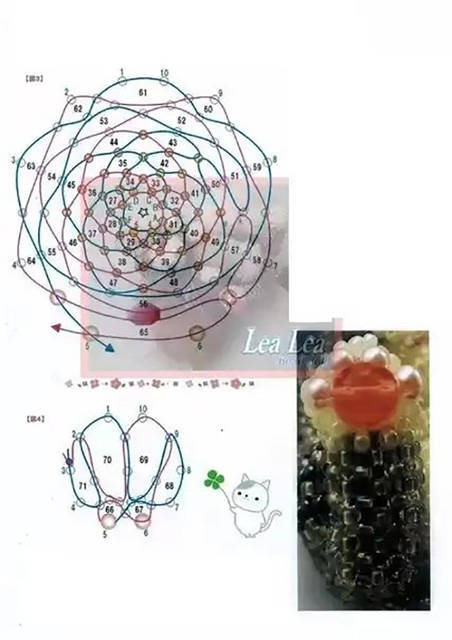
Kitty Woof made of beads
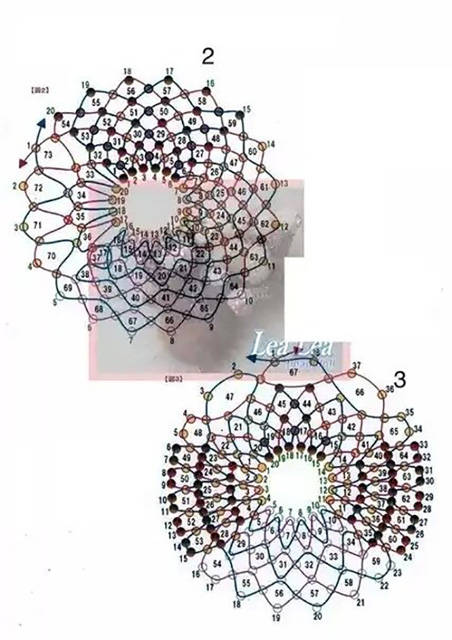
The little beaded kitten can be used as a keychain, a pendant for a bag or a cell phone. It can be presented to relatives or friends. Or you can make a collection of baby kittens. Before you start working, draw or print out a diagram. So you will be more convenient to work.
Weaving a kitten from beads begins with a head. Then weave the body, ears, upper and lower paws.
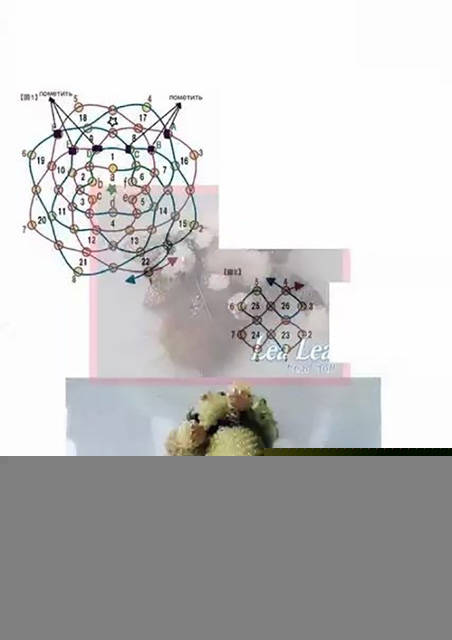
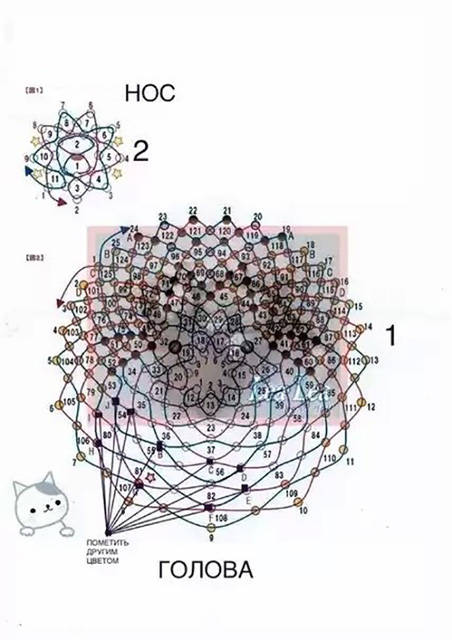
The head .
Plaiting begins by winding off enough fishing line. The length of the fishing line should not be less than 1 meter. Start weaving according to the scheme. All weaving steps are marked with numbers. Weave starting from the center of the head. On the second figure, in the center of the head, attach a ring for a pendant. Then, step by step, by numbers, weave head in a circle. We must not forget to weave in the right place beads for eyes.
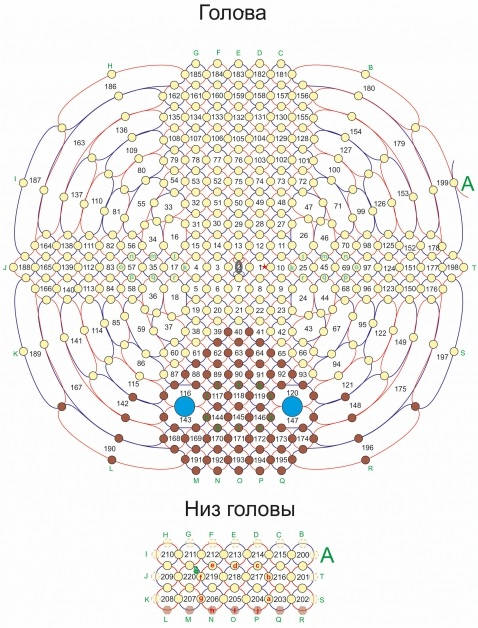
After weave head, you need to fill it with stuffing and weave the bottom. The beads to which you need to weave new rows are marked on the scheme with the letters A, B, C, D, E, F, G, H, I, J, K, L, M, N, O, P, Q, R, S, T. Tie up the ends of our fishing line and fasten it.
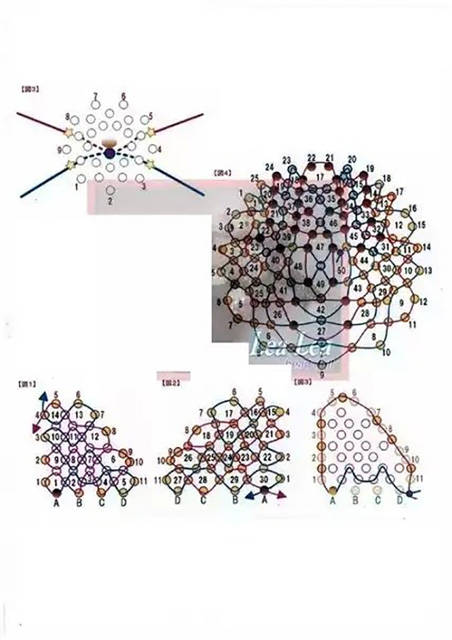
The torso .
Let's make a muzzle kitten. The muzzle is the beads a,b,c,d,e,f,g,h,i,j. Next, we make the ears. The diagram shows only the left ear. Right weave in mirror order – a,b,c,d,e…r.
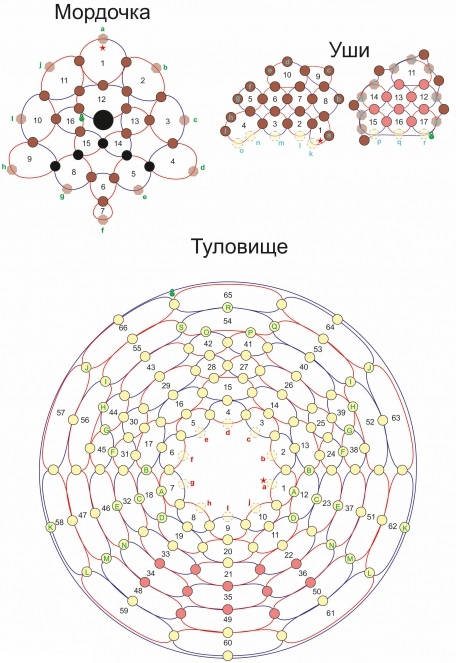
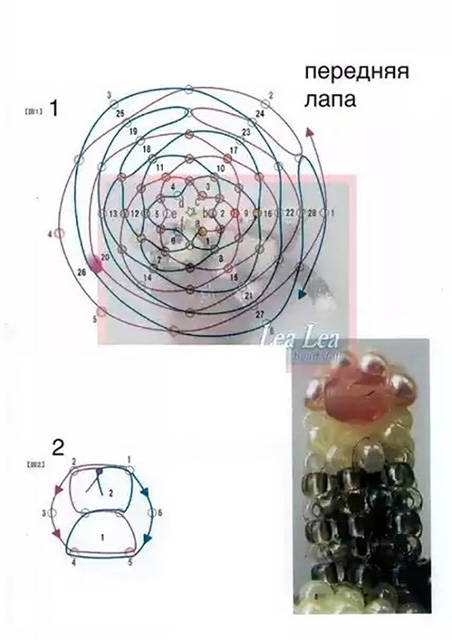
Braid the body to the head starting with a point with a star (point a). The connection point is marked in the diagram by points a,b,c,d,e,f, …j. After weaving the penultimate row, stuff the body with synthetic material and finish it. Fasten and tie the ends of the fishing line. Next, weave the scheme to the torso upper paws. We start with point A, then B,C,D.
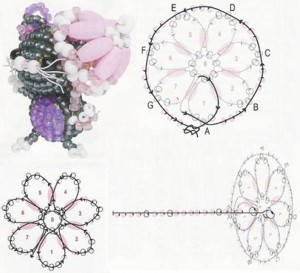
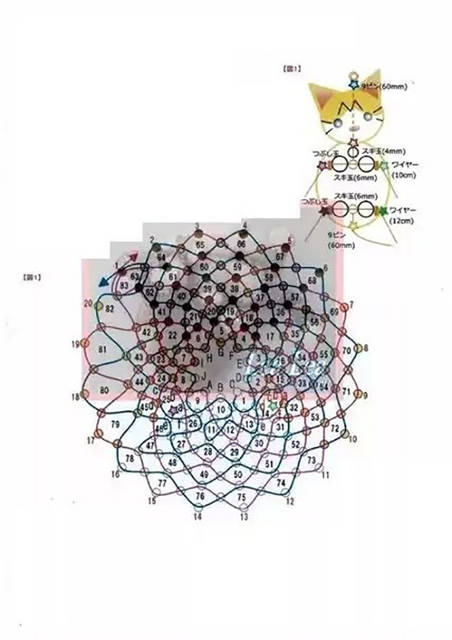
Kitten and cat with an umbrella
Two kittens can be weaved according to our scheme. Weave the product in parallel technique. Separately we will make an umbrella, according to the scheme.
Let's begin the work. The beginning of the weaving is marked with a knot in the diagram. String beads on a wire, according to the scheme. Weaving a yellow umbrella differs from the work on the pink just by the fact that the other beads are used. A bow is shown between rows 7 and 8. The pink bow for the cat is braided separately and then attached to the neck of the finished figure. Row 12 and 13 are the eyes and nose of the cat. We make whiskers from thin wire.
A master class on making a kitten named Woof
This cat will also be volumetric, and the technique of weaving in many ways similar to the manufacture of the previous toy.You will need to prepare:
- beads (the main color will be yellow, brown beads of two shades are needed to create the paws, tail, ears and muzzle, and light yellow – for the inner surface of the ears);
- details (17 black beads for the nose and eyes, 24 blue and 2 white – for the eyes, 2 red – for the mouth);
- All other tools (fishing line, wire, glue, needles, etc.).
 In the master class for making a three-dimensional cat told how to make blanks from balls. You can make them out of plasticine, paste paper, paint or mark yourself with a pencil where the color of the beads on the muzzle should change.The eyes and ears are woven using the technique of hand weaving, so for beginners this task may not be easy.
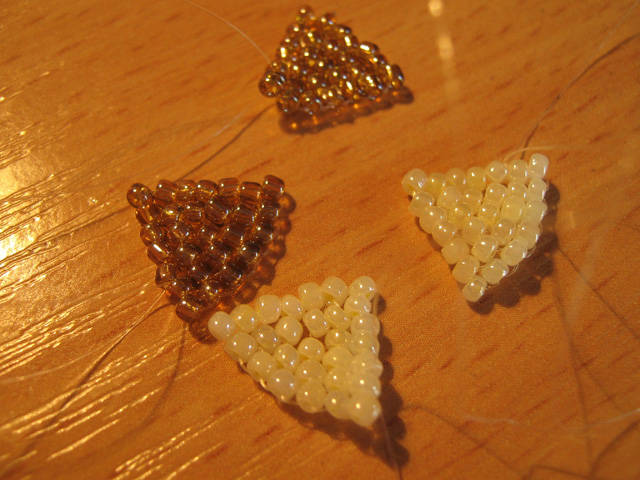

 Body and paws of this kitten, unlike the previous, is stuffed with cotton or other filler. After braiding the head just continue to weave rows with additions.Paws need to do mosaic weaving, and then attach them to the torso. Next, you will weave only the back, and on the side of the paws will not need beads. The back to the tail will gradually narrow, and when you reach the base, you will need to stuff the kitten with absorbent cotton and weave the body to the end.
  You only need to attach the tail and make a moustache from black fishing line.
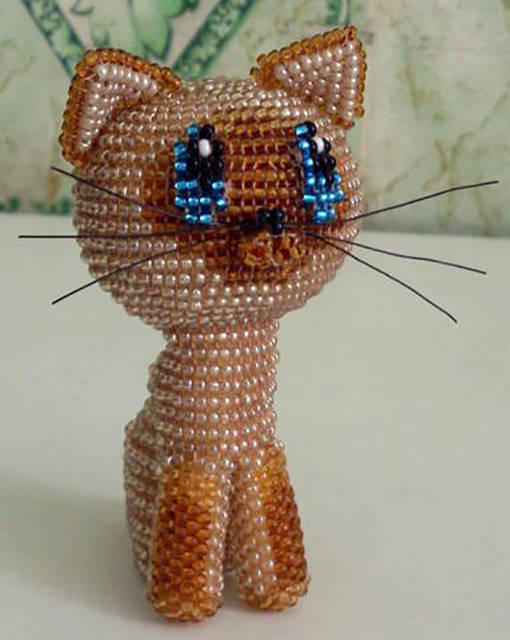
Master class on "monastic" weaving
 Materials and tools are almost the same as in the previous master-classes, however, beads for such a kitten should choose small and opaque, at least two different colors. For this kind of kitten we need not only small beads for eyes and a nose, but also bigger ones of which you can make cushions on her hind paws.

As you can see, with a little effort and patience, you can create real masterpieces on your own and please your loved ones with beautiful original gifts.